Warning: Undefined array key "HTTP_ACCEPT_LANGUAGE" in /home/economi1/wholefoodmag.com/index.php on line 18
Warning: Cannot modify header information - headers already sent by (output started at /home/economi1/wholefoodmag.com/index.php:18) in /home/economi1/wholefoodmag.com/wp-includes/feed-rss2.php on line 8 Whole Food Mag
https://wholefoodmag.com
Food BlogWed, 25 Mar 2026 17:17:38 +0000en-US
hourly
1 https://wordpress.org/?v=6.8.2Regenerating Land and Nourishing People: How Playa Venao Is Rebuilding Health From the Soil Up
https://wholefoodmag.com/regenerating-land-and-nourishing-people-how-playa-venao-is-rebuilding-health-from-the-soil-up/
https://wholefoodmag.com/regenerating-land-and-nourishing-people-how-playa-venao-is-rebuilding-health-from-the-soil-up/#respondThu, 08 Jan 2026 17:41:18 +0000https://wholefoodmag.com/?p=23798Cocobolo Wellness Village: Where Pure Food and Water Become Medicine
Panama’s Revolutionary Wellness Community Proves the Simplest Path to Health Starts with What We Consume
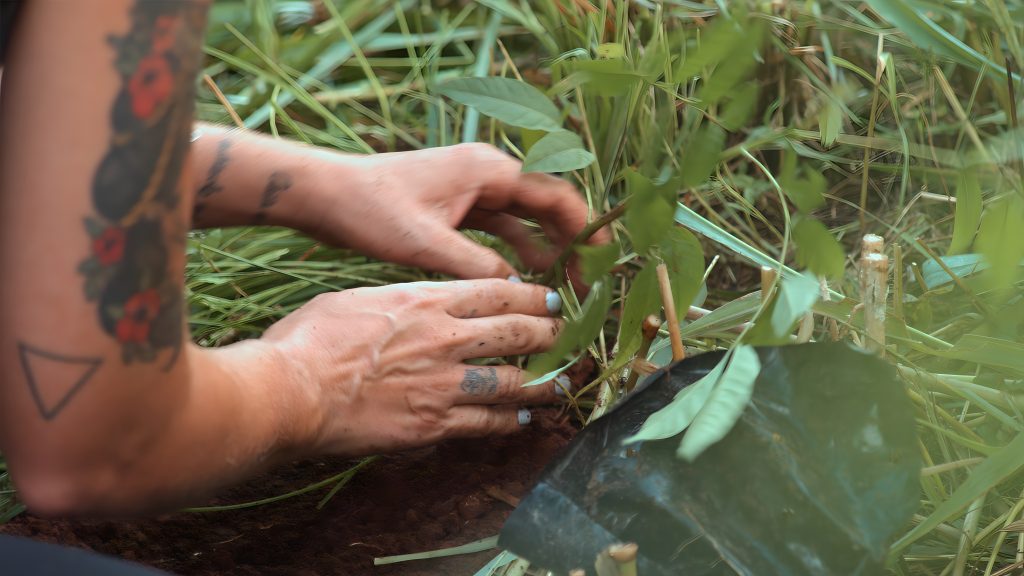
In Panama’s rare tropical dry forest, a groundbreaking wellness village is demonstrating a powerful truth: the healthiest thing we can do for our bodies is remarkably simple—eat food grown without chemicals and drink highly purified water straight from the land.
Cocobolo, developed by Canopy Development Company in partnership with the Momentis family office, represents a radical return to the foundations of human wellness. While modern health solutions grow increasingly complex and costly, Cocobolo’s approach is elegantly straightforward: invest innovation and design into humanity’s three foundational needs—food, water, and shelter—and wellness becomes a natural outcome rather than an endless pursuit.
When you remove chemicals from your food, impurities from your water, and design shelters that connect you to nature rather than separate you from it, the body’s innate healing capacity awakens.
The Food-Water-Shelter Foundation
“We’ve complicated health to the point where people have forgotten that our bodies are designed to thrive when given clean inputs and connection to nature,” explains founder Caroline Howell. “Chemical-free food, purified water, and shelter that connects us to the living world aren’t luxuries—they’re the baseline our biology requires. Everything else we do for wellness builds on this foundation.”
At Cocobolo, this philosophy manifests in living systems designed to nourish residents at every level:
Pure, Chemical-Free Nutrition The wellness village produces its own nutrient-dense, organic food through regenerative sintropic agroforestry. Over 37,000 wild food and medicinal trees form the backbone of the community’s food system, supplemented by advanced growing methods including aeroponics and hydroponics—all without synthetic pesticides, herbicides, or fertilizers.
The result is food as nature intended: bursting with bioavailable nutrients, free from toxic residues, and alive with the enzymes and beneficial compounds that industrial agriculture strips away.
Water as It Should Be Cocobolo’s natural water filtration system delivers highly purified water directly from the land—no municipal treatment, no chlorine, no fluoride, no pharmaceutical residues. The water residents drink carries the vitality of the forest itself, naturally mineralized and free from the thousands of contaminants found in conventional water supplies.
Shelter That Heals Every building at Cocobolo embraces biophilic design—architecture that actively promotes wellness through connection to nature. Rather than separating residents from the forest, homes integrate with it, creating living spaces where the boundaries between inside and outside dissolve, where natural light and forest air flow freely, and where every view reinforces the healing power of the natural world.
Reconnecting Health to the Land
The transformation residents experience speaks to the power of this integrated approach. When the body stops processing pesticides, herbicides, heavy metals, microplastics, and the cocktail of chemicals present in conventional food and water, it can redirect that energy toward healing, vitality, and longevity. When shelter reconnects you to nature through biophilic design rather than isolating you in sterile boxes, stress dissolves and wellbeing becomes the baseline.
“People arrive at Cocobolo carrying the toxic load of modern life and the disconnection of conventional living,” Howell notes. “Within weeks of eating our food, drinking our water, and living in spaces that breathe with the forest, they report clearer thinking, better sleep, reduced inflammation, and a sense of vitality they’d forgotten was possible. This isn’t alternative medicine—it’s just removing the interference in all three foundational areas—food, water, shelter—so the body can do what it does best.”
Technology in Service of Purity
Cocobolo employs sophisticated technology not to replace nature, but to work with it more effectively. AI-assisted land analysis ensures home sites integrate seamlessly with natural systems, protecting watersheds and forest canopy that keep water sources pristine. The Wallacea Trust biodiversity method provides measurable data on ecological health, ensuring the land that nourishes residents remains vibrant and alive.
Advanced growing systems maximize nutrient density while maintaining absolute purity. Every input is scrutinized, every output monitored. The commitment is total: zero compromise on the quality of what enters residents’ bodies.
The WELL Standard: Measurable Wellness by Design
Cocobolo’s commitment to health extends beyond food and water to encompass every aspect of the built environment. The wellness village has engaged Dr. Jie Zhao, one of the original developers of the International WELL Building Institute’s requirements for the WELL Building Standard—the premier global certification for buildings that advance human health and wellness.
Under Dr. Zhao’s guidance, Cocobolo’s entire master plan and all buildings meet WELL Standard requirements, ensuring that air quality, light, thermal comfort, acoustics, materials, and mind—in addition to water and nourishment—are optimized for human health. This means residents aren’t just consuming pure food and water; they’re breathing purified air, living in spaces free from toxic materials, and experiencing environments scientifically designed to support physical and mental wellbeing.
Biophilic Architecture: Nature as Medicine
All of Cocobolo’s buildings embrace biophilic design principles—architecture that actively connects residents to the natural world. Large windows frame forest views, natural materials echo the surrounding landscape, and indoor-outdoor spaces blur the boundaries between shelter and nature. Studies show that biophilic environments reduce stress hormones, lower blood pressure, improve cognitive function, and accelerate healing.
“We’re not building homes that separate people from nature—we’re creating shelter that deepens the connection,” Howell explains. “Every sightline to the forest canopy, every natural material choice, every space designed for cross-ventilation carrying forest air—these aren’t aesthetic choices. They’re wellness interventions.”
Innovation Applied to What Matters Most
Cocobolo represents a fundamental reframing of where innovation belongs. Rather than applying technology to convenience or entertainment, the wellness village invests innovation and design into humanity’s three foundational needs: food, water, and shelter.
Food innovation: Sintropic agroforestry, aeroponics, and hydroponics that maximize nutrient density without chemicals
Water innovation: Natural filtration systems delivering pharmaceutical-grade purity straight from the land
Shelter innovation: WELL-certified, biophilic architecture that promotes wellness through connection to nature
“The WELL Standard provides rigorous, evidence-based criteria for how the built environment impacts human health,” notes Howell. “By engaging one of its original architects and committing to biophilic design throughout, we’re ensuring that Cocobolo doesn’t just talk about wellness—we’ve engineered it into every structure, every material choice, every design element. When you invest innovation into food, water, and shelter—the foundations of human existence—you create conditions where wellness becomes inevitable rather than aspirational.”
A Living Laboratory for Wellness
Located in the planet’s most endangered ecosystem—the tropical dry forest—Cocobolo is proving that human wellness and ecological health are inseparable. The same practices that regenerate the forest regenerate human bodies. The same water that flows through wildlife corridors flows through residents’ cells. The same soil that nourishes ancient trees produces the food on residents’ tables.
With over 90% of tropical dry forests lost globally, Cocobolo sits within a planned biological corridor between two nature reserves, helping restore habitat for endangered species while simultaneously restoring human health through the most ancient prescription known: clean food and pure water.
The Wellness Revolution Starts with Basics
In an era of biohacking, supplements, and complex health protocols, Cocobolo’s message is refreshingly direct: before seeking exotic solutions, ensure you’ve mastered the basics. Chemical-free food, highly purified water, and biophilic shelter that connects you to nature aren’t the complete picture of health, but they are the essential foundation upon which all other wellness practices are built.
“We’re not anti-technology or anti-progress,” Howell emphasizes. “We’re pro-wisdom. We use innovation to optimize humanity’s three foundational needs—food, water, and shelter. The most sophisticated thing we can do is invest design and technology into these fundamentals that have sustained human health for millennia, creating conditions where the simplest things—pure food, clean water, shelter connected to nature—are not just available but exceptional.”
For the entrepreneurs, creatives, and health-conscious individuals choosing Cocobolo as home, the promise is straightforward: live in a place where the most important decisions affecting your health—what goes into your body and how your shelter relates to the natural world—are already optimized. Where the water flowing from your tap is as pure as mountain springs. Where the food on your plate is medicine, not just sustenance. Where your home deepens rather than severs your connection to the living world.
Creating the Future of Wellness
Cocobolo wellness village demonstrates that the path forward isn’t more complex—it’s more intentional. By investing innovation into the three foundations of human existence—food, water, and shelter—rather than chasing endless supplements and treatments, true wellness becomes accessible and sustainable. As founders Caroline Howell and Omani Carson (through Momentis family office) continue developing this model, they’re proving that real estate can be reimagined as wellness infrastructure, where the built environment actively contributes to resident health through regenerative food systems, purified water, and biophilic architecture.
“We’re creating a world where wellness isn’t something you pursue—it’s something you inhabit,” Howell concludes. “Where every glass of water, every meal, and every moment in your home moves you toward greater vitality. When you get food, water, and shelter right—when you invest real innovation into these foundations—everything else becomes easier. That’s the power of prioritizing what truly matters. That’s the promise of Cocobolo.”
About Cocobolo Wellness Village Part of Canopy Development Company’s Keystone Development model, Cocobolo is a wellness-focused community in Panama that invests innovation and design into humanity’s three foundational needs: food, water, and shelter. Through chemical-free nutrition systems, naturally purified water, and WELL-certified biophilic architecture, Cocobolo creates conditions where wellness is inevitable. Working with Dr. Jie Zhao, one of the original developers of the WELL Building Standard, all buildings and the master plan meet WELL certification requirements. Through partnership with Momentis family office, the village demonstrates that when you optimize the foundations of human existence, extraordinary health becomes accessible to all residents.
kebo88 | slot gacor | situs slot gacor]]>https://wholefoodmag.com/regenerating-land-and-nourishing-people-how-playa-venao-is-rebuilding-health-from-the-soil-up/feed/0Mindful Eating for Families: Turning Meals Into Connection
https://wholefoodmag.com/mindful-eating-for-families-turning-meals-into-connection/
https://wholefoodmag.com/mindful-eating-for-families-turning-meals-into-connection/#respondMon, 17 Nov 2025 23:00:10 +0000https://wholefoodmag.com/?p=23776Mariana Gordon and Sondra Bakinde, the creators of The Mindful Mantis series.
Dinner can be the most nourishing part of the day, and not only because of what is on the plate. When families slow down, breathe, and notice with their senses, mealtime becomes a small laboratory for attention, empathy, and choice. The vision behind The Mindful Mantis comes from Mariana Gordon, a mindfulness educator whose background in children’s counseling informs its evidence-based approach, and Sondra Bakinde, an artist and wellness advocate who infuses every practice with creativity and warmth. Together, they guide families in turning everyday meals into playful, mindful rituals that build connection, confidence, and calm.
Why mindful eating builds resilience
Food is information for the body and a story for the nervous system. Predictable, caring rituals around meals tell a child’s body that it is safe. In that state, digestion improves, attention steadies, and kids are more open to new foods. This is mindful parenting in action. You are not forcing bites. You are teaching presence, autonomy, and curiosity. Over time, those skills travel far beyond the table.
Children’s mindfulness gives meal routines a clear purpose. When kids practice noticing flavor, texture, temperature, and hunger cues, they strengthen interoception, which is the brain’s ability to sense internal signals. That awareness helps kids recognize full and hungry, excited and overwhelmed, ready and tired. It is the same awareness that makes school transitions smoother and sibling conflicts shorter.
The 5-part mindful meal
You do not need extra time to make meals more mindful. You need tiny, repeatable cues that the body can trust.
1) Arrival breath Before anyone reaches for plates, take three balloon breaths. Hands on bellies, inhale to rise, exhale to soften. This two minute reset prepares taste buds and tempers reactivity.
2) Sensory check Invite playful noticing. What color stands out on your plate. What does your fork smell like today. A light tone keeps kids engaged and quietly boosts attention.
3) Gratitude phrase Offer one sentence each. Thank you to the hands that cooked. Thank you to the sun that grew the tomatoes. Gratitude nudges the brain toward connection and primes flexible thinking.
4) Choice within structure Provide two clear options. Carrots or cucumbers first. Rice or beans as the anchor. Choice protects dignity while keeping boundaries clear.
5) Gentle close End with a one minute body scan story. Toes, knees, belly, heart, and forehead each get a friendly hello. This signals completion and helps transition to cleanup or bedtime.
Practiced consistently, this flow teaches kids to arrive, attend, choose, and close. Those are the same steps that build resilience in classrooms and on playgrounds.
Kids engaging in calming mindfulness routines, including sound-bowl meditation and gentle sensory grounding. These real-life moments show how families use simple practices to support emotional regulation, body awareness, and peaceful connection.
Kids meditation before a bite
A calm body is more likely to try a new food. Keep kids meditation short, sensory, and a little bit silly so attention can hold.
Steam dragon. Pretend a warm bowl is a tiny cauldron. Smell with a slow inhale. Blow a gentle stream to cool it with a longer exhale.
Star tracing. Trace five points on a hand under the table. Inhale up a side, exhale down, then take a bite.
Color hunt. Choose a color and find it in your food. One green, one orange, one purple if you are lucky.
These mini practices are not about perfect calm. They are about teaching the body how to return to steady so the nervous system can explore. Over weeks, children notice they can feel big feelings about food and still make a brave choice.
Nutrition meets connection
Whole foods feed more than cells. They feed rituals. A tray of cut veggies becomes a rainbow game. A pot of beans turns into a conversation about where ingredients come from. A citrus slice invites a mindful squeeze and smell before tasting. Keep props simple so rituals travel from apartment to picnic table to grandparents’ kitchen.
Mindful parenting emphasizes rhythm over rules. Predictable meal anchors reduce decision fatigue and encourage variety without a fight. A vegetable always appears. A protein always appears. A familiar food always appears. Kids learn that their job is to listen to their bodies and practice one curious bite, today or another day. Parents learn to protect connection while still offering structure.
Build a shared language across kitchens and classrooms
Kids learn faster when the same cues show up in multiple places. Ask your child’s teacher what language they use for transitions or tasting in class. Mirror one phrase at home. A small card on the fridge that reads Name it, breathe it, choose it turns tension points into teachable moments. If your family wants a guided path, the short, playful lessons and printable scripts in the Magic Mantis Course translate research into two minute practices that fit real schedules and short attention spans.
When picky meets anxious
Selective eating often has roots in sensitivity and state, not stubbornness. Try these compassionate adjustments.
Pair a small new food with a safe one and keep portions tiny to lower the stakes.
Offer a job. Stir the pot, plate the parsley, or choose the napkin color. Participation builds agency.
Name the feeling before the fix. I see worry in your eyes. Let us breathe first, then choose our first bite.
These strategies protect dignity, which keeps kids engaged. Over time, you will see shorter escalations, steadier trying, and quicker repair after tough meals.
What progress really looks like
Change usually whispers. It looks like two brave tastes in a week, a quieter no thank you, or a child who suggests a breath before trying the soup again. It sounds like I feel full instead of my tummy hurts. It feels like fewer tug-of-war moments because choices come earlier. Celebrate effort. Emotional wellness grows through repetition and modelling, not through perfect plates.
Beautiful, nature-inspired children’s book covers featuring The Meditating Mantis and Mio & The Stoic Spider. These mindfulness stories teach calm, emotional awareness, and resilience through gentle animal characters and vibrant illustrations by Mariana Gordon and Sondra Bakinde.
A nurturing next step
At The Mindful Mantis, we love meeting parents right where they are. If you want a playful story that doubles as a meditation, exploreThe Meditating Mantis and Mio & The Stoic Spider which is a gentle, science-savvy way to begin a lifelong practice of calm and resilience, one page and one breath at a time.
kebo88 | slot gacor | situs slot gacor]]>https://wholefoodmag.com/mindful-eating-for-families-turning-meals-into-connection/feed/0Building Bone Density Naturally: A Deep Dive into The Stronger Bones Companies
https://wholefoodmag.com/building-bone-density-naturally-a-deep-dive-into-the-stronger-bones-companies/
https://wholefoodmag.com/building-bone-density-naturally-a-deep-dive-into-the-stronger-bones-companies/#respondMon, 10 Nov 2025 18:48:32 +0000https://wholefoodmag.com/?p=23769Osteoporosis, a condition that silently weakens bones, casts a long shadow over millions, particularly as they navigate the complexities of aging. While conventional medicine often prescribes a narrow path of calcium supplements and pharmaceuticals, a growing movement seeks a more holistic and empowering approach. At the forefront of this revolution stands Kevin Ellis, The Bone Coach, and his visionary creation, The Stronger Bones Companies, a multi-faceted strategy designed to not just halt, but reverse bone loss.
The Stronger Bones Companies, encompassing BoneCoach.com, HealthyBonesCo.com, and OsteoIQ.com, transcends the limitations of traditional bone health management. It’s a meticulously crafted framework that recognizes the intricate interplay of nutrition, lifestyle, cellular function, and even emotional well-being in maintaining skeletal integrity. This isn’t just about preventing fractures; it’s about reclaiming vitality and living fearlessly.
Kevin Ellis’s own journey with osteoporosis, diagnosed at a young age, served as a stark wake-up call. He witnessed firsthand the inadequacy of conventional treatments, which often left patients feeling disenfranchised and fearful. “People come to us because they’ve seen the devastating impact of osteoporosis on loved ones,” Ellis explains. “They’re tired of the ‘wait and see’ approach and the fear of fractures. Our mission is to dismantle the myth that genetics are destiny and fractures are inevitable.”
This personal odyssey fueled the creation of BoneCoach.com, a digital haven for comprehensive bone health education and support. Recognizing that bones require more than just a superficial dose of calcium, Ellis pioneered the Stronger Bones Solution, a personalized coaching program integrating targeted exercises, nutrient optimization, and mindset shifts. This program delves into the root causes of bone loss, empowering individuals to take an active role in their skeletal health.
A pivotal component of the ecosystem is Healthy Bones Co., a purveyor of professional-grade supplements designed to address the nuanced nutritional needs of bone health. Unlike mass-market supplements, Healthy Bones Co. prioritizes clinically validated ingredients and synergistic formulations.
The Healthy Bones Co. Collagen Peptides stand as a testament to this commitment. This isn’t your average collagen; it’s a meticulously crafted blend of four patented Bioactive Collagen Peptides: FORTIBONE®, FORTIGEL®, VERISOL®, and TENDOFORTE®. Each peptide offers targeted benefits, from stimulating bone formation (FORTIBONE®) to supporting joint health (FORTIGEL®) and enhancing skin elasticity (VERISOL®). This comprehensive approach reflects a deep understanding of collagen’s multifaceted role in connective tissue health.
The science underpinning these peptides is compelling. Clinical trials have demonstrated FORTIBONE®’s ability to increase bone mineral density in postmenopausal women, a critical factor in fracture prevention. FORTIGEL® has shown significant promise in alleviating osteoarthritis pain, while VERISOL® has been proven to reduce wrinkles and improve skin hydration.
Complementing the collagen peptides is Annatrol Bone Support, featuring Annatto Tocotrienols and Geranylgeraniol (GG). These potent nutrients address cellular energy production, inflammation modulation, and the preservation of muscle mass, all vital for bone health. Tocotrienols have demonstrated the ability to suppress bone resorption and promote bone formation, while GG supports mitochondrial function and the synthesis of Vitamin K2 (MK-4), a critical cofactor in bone mineralization.
The Stronger Bones Companies embraces the power of data-driven insights through OsteoIQ.com. This platform provides access to advanced bone health assessments, including bone density, bone quality, bone turnover markers, and genetic predispositions. By analyzing these biomarkers, individuals gain a deeper understanding of their bone health trajectory.
“We empower individuals to track their bone health proactively,” Ellis emphasizes. “By monitoring bone cell activity and turnover, we can identify potential issues early and tailor interventions to maximize bone-building efforts.”
This proactive approach transcends the limitations of traditional bone density scans, which offer a snapshot in time. OsteoIQ’s comprehensive assessments provide a dynamic view of bone health, enabling individuals to make informed decisions about their lifestyle and supplementation strategies.
At the heart of The Stronger Bones Companies lies a vibrant community of individuals united by a shared commitment to bone health. BoneCoach.com serves as a digital hub for education, support, and connection. The Stronger Bones Solution program has fostered a global network of individuals, creating a sense of belonging and collective empowerment.
This community-centric ethos extends beyond online platforms. The Stronger Bones Companies actively support philanthropic initiatives, such as No Kid Hungry, recognizing the interconnectedness of health and well-being.
The Stronger Bones Companies represents a paradigm shift in bone health management. It’s a holistic, evidence-based approach that empowers individuals to take control of their skeletal health. By integrating education, targeted supplementation, and advanced testing, Kevin Ellis and his team have created a transformative framework for building stronger bones and living a life of vitality.
Looking ahead, the vision is to expand the reach of this ecosystem, empowering millions to embrace a proactive approach to bone health. The Stronger Bones Companies aim to redefine the narrative around osteoporosis, shifting from fear and resignation to empowerment and resilience. This is more than just about bones; it’s about reclaiming the freedom to live life to the fullest.
The Stronger Bones Companies is not merely a collection of products and programs; it’s a comprehensive philosophy that recognizes the interconnectedness of bone health with overall well-being. By addressing the root causes of bone loss and providing individuals with the tools and support they need, Kevin Ellis and his team are empowering people to take control of their skeletal health and live active, fulfilling lives. The future of bone health is not about fear and limitations; it’s about empowerment, knowledge, and the unwavering belief that stronger bones are within reach for everyone.
This website may contain affiliate links and advertising so that we can provide recipes to you. Read my disclosure policy.
These copycat Starbucks Italian Sausage Egg Bites are our new favorite! I had to recreate, and honestly, they taste even better than Starbucks. With more sausage and flavor in every bite, they’re perfect for busy mornings!
Skip the Drive-Thru, Thank Me Later
Better than Starbucks: More sausage, more flavor, and no skimping on the good stuff.
Budget-friendly: A whole batch costs less than two trips through the drive-thru!
Meal prep win: Make a batch once, store in the fridge or freezer, and reheat for grab-and-go breakfasts all week.
Starbucks Italian Sausage Egg Bite Ingredients
Change the Cheese: You can swap out the cheese to your liking! Try gruyere, cheddar, pepper jack, or Swiss cheese.
Veggies: You can add sautéed onions, red peppers, or spinach for extra flavor.
Sun-Dried Tomatoes: Drain the sun-dried tomatoes well! Tip: Use a paper towel to absorb any excess oil!
Sausage: You can use spicy or mild sausage!
My family is obsessed with Starbucks bacon egg bites, so when they released a sausage version, I had to try! Starbucks skimped on the sausage, so I loaded my version up! You don’t even need a fancy sous-vide machine to make these!
Prepare & Water Bath: Preheat the oven to 300°F with the rack placed in the center. Place a second rack just beneath it and add an empty baking sheet. Fill the empty baking sheet with water to create steam in the oven. Spray a muffin pan well with nonstick cooking spray and set aside. In a blender, add the eggs, cottage cheese, salt, pepper, and dried basil.
Blend: Blend for 15-20 seconds until smooth.
Combine: Transfer the egg mixture to a large bowl and stir in the shredded cheese, sun-dried tomatoes, and the cooked and crumbled Italian sausage. Use a measuring cup to scoop the egg mixture into the wells of the muffin tin, filling them no more than ⅔ of the way full. Try to disperse the sausage evenly throughout the muffin wells.
Bake: Place the muffin tin on the middle rack of the oven and bake for 30-35 minutes or until the center of the egg bites is set. Remove Starbucks egg bites from the oven and let them cool completely before removing from the pan.
Alyssa’s Pro Tip
How do I get them out of the pan? You can loosen the sides from the pan by running a small silicone spatula around the edges before gently lifting them.
Preheat the oven to 300 degrees Fahrenheit with the rack placed in the center of the oven. Place a second rack just beneath it and add an empty baking sheet. Fill the empty baking sheet with water to create steam in the oven. Spray a muffin pan well with nonstick cooking spray and set aside.
In a blender, add 8 large eggs, ⅔ cup whole-fat cottage cheese, ¼ teaspoon salt, ¼ teaspoon ground black pepper, and 1 teaspoon dried basil. Blend for 15-20 seconds until smooth.
Transfer the egg mixture to a large bowl and stir in 1 ½ cups shredded Monterey Jack cheese, ¼ cup diced sun-dried tomatoes, and 1 cup cooked and crumbled Italian sausage. Use a measuring cup to scoop the egg mixture into the wells of the muffin tin, filling them no more than ⅔ of the way full. Disperse the sausage evenly throughout the muffin wells.
Place the muffin tin on the middle rack of the oven and bake for 30-35 minutes or until the center of the egg bites is set. Remove from the oven and let them cool completely before removing from the pan. You can loosen the sides from the pan by running a small silicone spatula around the edges before gently lifting them.
Storage: Keep leftovers in an airtight container in the fridge for up to 4 days. Reheat in the microwave for 30–50 seconds.
Freezer-Friendly: Freeze on a parchment-lined baking sheet until solid (about 2 hours), then transfer to a freezer bag for up to 3 months. Thaw overnight in the fridge or microwave in 30-second intervals at 50% power.
Alyssa Rivers is the author of ‘The Tried and True Cookbook’, a professional food photographer and experienced recipe-developer. Having a passion for cooking, her tried and true recipes have been featured on Good Morning America, Today Food, Buzzfeed and more.
This website may contain affiliate links and advertising so that we can provide recipes to you. Read my disclosure policy.
Apple cider chicken thighs bring all the best fall flavors to your plate! Juicy chicken, caramelized apples, and a rich cider sauce for the ultimate cozy dinner.
Why You’ll Fall for This Dish
Sweet & Savory:The tender apples and savory seasoning create a perfect flavor balance.
One-Skillet Wonder: Everything cooks together for easy prep and cleanup.
Full of Fall Flavor: Warm spices, tender chicken, and a cider pan sauce that tastes like the season.
Apples: Skip soft apples like McIntosh or Red Delicious. Choose crisp ones like Granny Smith, Pink Lady, Honeycrisp, or Gala.
Apple Cider: Use fresh cider for the best flavor. Apple juice works in a pinch, but not apple cider vinegar. I like grabbing mine at the farmer’s market.
How to Make Apple Cider Chicken Thighs
This apple cider chicken thigh recipe comes together fast! Browning the chicken first ensures a crispy, golden exterior, and using fresh apples and cider makes the flavors shine.
Prepare the Chicken: Thoroughly pat the chicken thighs dry with paper towels.
Season Chicken: Combine salt, black pepper, dried thyme, dried sage, ground allspice, onion powder, and garlic powder in a large bowl, then coat the chicken in the seasoning blend.
Cook the Chicken: Add the seasoned chicken thighs, top-side down, to a heated skillet. Cook for 5-7 minutes, until golden brown. Flip and cook for 5-7 minutes more, until the internal temperature reaches 165ºF. Remove the chicken to a plate.
Brown the Apples: Melt the butter in the skillet and cook the apple slices for 2 minutes, until they are lightly browned, then flip them to cook the other side for an additional 2 minutes.
Start the Sauce: Add apple cider, chicken broth, and Dijon mustard to the skillet, then bring to a simmer. Once simmering, cook for about 10 minutes. Taste and season with salt and pepper as needed.
Finish the Sauce: Combine cornstarch with water in a small bowl before whisking it into the sauce. Once thickened, add the chicken thighs back to the skillet and cook for about 2 minutes until they’re heated through. Spoon the sauce and apples over the chicken, then garnish with fresh thyme or parsley and serve.
Alyssa’s Pro Tip
Chicken Thighs: Bone-in, skin-on thighs work; you will just need to cook them longer. Sear skin-side down for 10 minutes, then flip and cook for an additional 15 minutes, or until the internal temperature reaches 165°F.
2largeapplessliced into ¼-inch thick slices, peeling optional
1 ¾cupsfresh apple cider
¼cupchicken broth
1teaspoonDijon mustard
1tablespooncornstarchfor slurry
2tablespoonswaterfor slurry
fresh thyme or parsleyoptional garnish
Combine 1 teaspoon salt, ½ teaspoon ground black pepper, ½ teaspoon dried thyme, ¼ teaspoon dried sage, ¼ teaspoon ground allspice, ¼ teaspoon onion powder, and ¼ teaspoon garlic powder in a large bowl.
Thoroughly dry 2 pounds boneless, skinless chicken thighs by patting them with paper towels before adding them to the bowl with the spices. Toss until evenly coated in the rub.
Heat a large 14-inch skillet over medium heat. Add 2 tablespoons olive oil to the skillet.
Add the seasoned chicken thighs top-side down to the skillet. Cook for 5-7 minutes, until golden brown. Flip and cook for an additional 5-7 minutes, until the internal temperature of the chicken reaches 165 degrees Fahrenheit. Remove the chicken to a plate.
Add 1 tablespoon unsalted butter to the skillet. Once melted, add 2 large apples and spread them into an even layer. Cook for 2 minutes, until the apples are lightly browned before flipping them to cook the other side for another 2 minutes.
Add 1 ¾ cups fresh apple cider, ¼ cup chicken broth, and 1 teaspoon Dijon mustard to the skillet and bring to a simmer. Simmer for about 10 minutes until reduced by half. Taste and season with additional salt and pepper as needed.
Combine 1 tablespoon cornstarch with 2 tablespoons water in a small bowl before whisking it into the sauce. Once thickened, add the chicken thighs back to the skillet and cook for about 2 minutes until the chicken is heated through.
Spoon the sauce and the apples over the chicken before garnishing with fresh thyme or parsley and serving.
Nutrition information is automatically calculated, so should only be used as an approximation.
More One-Pan Chicken Recipes
About Alyssa Rivers
Alyssa Rivers is the author of ‘The Tried and True Cookbook’, a professional food photographer and experienced recipe-developer. Having a passion for cooking, her tried and true recipes have been featured on Good Morning America, Today Food, Buzzfeed and more.
This website may contain affiliate links and advertising so that we can provide recipes to you. Read my disclosure policy.
This weekly meal plan is full of hearty family favorites. They’re easy and cozy dinners that everyone will love. For even more ideas, check out my other meal plans here.
The goal of this weekly meal plan? Keeping dinner simple, satisfying, and stress-free. Bonus: these meals are easy on the budget but big on flavor, so you can feel good about feeding the whole family without stretching your grocery bill.
Shredded Chicken Tacos are a filling and flavorful dinner ready in just 10 minutes. The chicken is perfectly seasoned and served on a warmed tortilla topped with all of your favorite toppings. It’s always a hit!
Level up your meatball game with the addition of ricotta cheese! These ricotta meatballs have the creamiest texture and turn out extra tender and juicy. The flavors are incredible and your family will beg you to make these every week!
This flavorful Chinese Chicken and Broccoli dish is made in just one pan and is ready in less than 30 minutes! Small pieces of tender chicken and broccoli florets are cooked in an irresistible sweet and savory sauce. Serve over rice with a sprinkle of sesame seeds and red pepper flakes for an amazing meal!
This free weekly meal plan is just what you need to get your week started. It provides five meals that will feed 4-6 (depending on whether you are feeding adults or kids), AND it includes a shopping list! With fresh new ideas and easy-to-make recipes, having a weekly menu plan will be a lifesaver.
Why Should I Meal Plan?
If you’ve ever hit 5 o’clock and wondered, “What am I making for dinner?”, meal planning is your new best friend. Here’s why it helps, especially for busy moms:
Saves time: No last-minute scrambling; you already know what’s for dinner.
Cuts stress: One less decision to make during the busiest time of day.
Keeps you on budget: Shopping with a plan means fewer random (and pricey) grocery trips.
Healthier choices: You’re less likely to grab takeout when dinner is ready to go.
My weekly meal plans always include a freeprintable shopping list that is measured out and ready to go. It makes things so easy! Click below and get shopping!
Storing Leftovers for Meal Planning
My meal plans are just for Monday through Friday. By the time the weekend rolls around, we’re usually out and about or eating up leftovers. Just be sure to store any leftovers in an airtight container so they stay fresh and ready when you are.
About Alyssa Rivers
Alyssa Rivers is the author of ‘The Tried and True Cookbook’, a professional food photographer and experienced recipe-developer. Having a passion for cooking, her tried and true recipes have been featured on Good Morning America, Today Food, Buzzfeed and more.
]]>https://wholefoodmag.com/weekly-meal-plan-57/feed/0The World’s Best Pumpkin Roll
https://wholefoodmag.com/the-worlds-best-pumpkin-roll/
https://wholefoodmag.com/the-worlds-best-pumpkin-roll/#respondSat, 06 Sep 2025 08:38:38 +0000https://wholefoodmag.com/the-worlds-best-pumpkin-roll/
This website may contain affiliate links and advertising so that we can provide recipes to you. Read my disclosure policy.
This really is the world’s best pumpkin roll! Soft, moist pumpkin cake wrapped around a sweet cream cheese filling and finished with a dusting of powdered sugar, it’s pure fall magic. The best part? It’s surprisingly easy to make.
A Reader’s Review
I made this Pumpkin Roll yesterday and it was an absolute hit! Excellent taste and texture and the best part was that it is so easy to make!! LOVE, LOVE, LOVE IT!
-Pamela
Pumpkin Roll Secrets I Swear By
No-Crack Confidence: Say goodbye to the messy towel method. With parchment, this roll lifts, rolls, and slices beautifully every time.
Perfect Texture: Rolling the cake while warm sets the curve, chilling locks it in, and my timing tricks keep it fluffy, not dry.
Pro Secrets Built In: From pure pumpkin purée (not pie filling!) to the right pan size, I’ve tested it all so you don’t have to.
How to Make the BEST Pumpkin Roll
Get ready to see how EASY it is to make this pumpkin roll! Seriously, you’ll want to make this all year long after trying it!
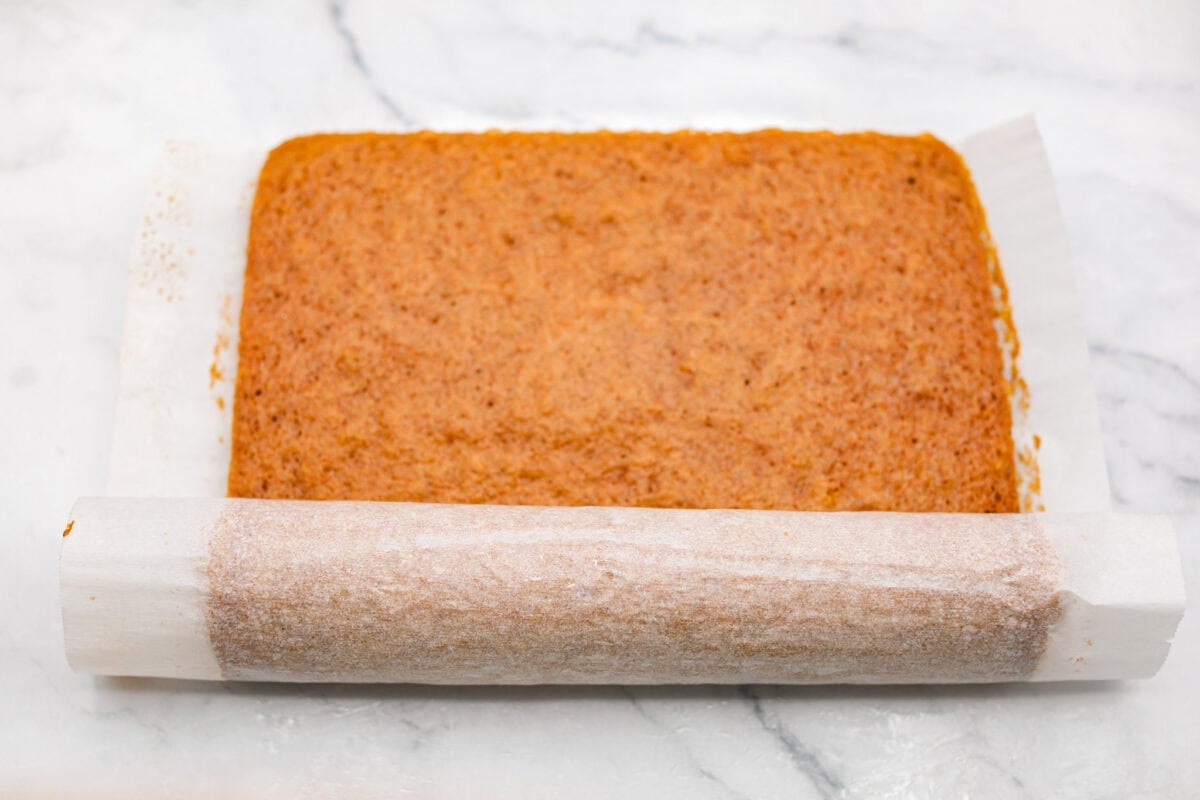
Prep & Parchment: Preheat oven to 375°F. Line a 10×15-inch jelly roll pan with parchment, leaving a 1-inch overhang, and lightly spray with cooking spray. *Parchment prevents sticking, makes lifting easy, and helps roll the cake without cracks. In a large bowl, beat eggs, sugar, pumpkin, vanilla, cinnamon, nutmeg, and cloves until combined.
Whisk & Mix: In a separate bowl, whisk together the flour, baking soda, and salt. Then, add the flour mixture to the egg mixture until just barely combined, and no streaks of flour remain.
Bake: Pour and spread the batter evenly in the prepared pan. Bake for 13-16 minutes, until the center of the cake springs back when gently pressed. *Start checking at 11 minutes.
Cool Rolled Up: Remove and allow it to cool until it’s cool enough to touch. Use the parchment to lift the cake out of the pan before gently rolling it up from one short end, rolling the parchment up inside. Keeping the cake in a roll, let it cool completely on a wire rack. *This sets the curve so it rolls back easily with filling.
Make Filling: While the cake cools, add the cream cheese, butter, powdered sugar, and vanilla to a large bowl and beat with a hand mixer until smooth.
Fill & Roll: Once the cake has cooled completely, carefully unroll it. Spread the cream cheese filling over the cake, leaving a ¼-inch border around the edges. Tightly roll the cake back up from the short side, removing the parchment paper as you go. Chill the cake for at least an hour, then sprinkle with powdered sugar and serve.
Alyssa’s Pro Pumpkin Roll Tips
If this is your first time making a roll cake, don’t worry, I’ve got you covered. Pay attention to the details in the instructions and follow these helpful tips.
Pan Size: A 10×15-inch jelly roll pan is ideal, but a 12×17-inch works, just reduce baking time by 2–3 minutes.
Filling: Don’t overfill. Leave a ¼–½ inch border to keep it from oozing.
Rolling: Roll snugly using the parchment, but not so tight that it cracks. Peel parchment slowly for a clean roll.
Chill Before Cutting: Refrigerate for at least 1 hour (or overnight) for clean, even slices. Use a sharp knife or unflavored dental floss.
Preheat the oven to 375 degrees Fahrenheit. Spray a 10 x 15 x 1-inch jelly roll pan with parchment paper, leaving a 1-inch overhang on both sides. Lightly spray the parchment with nonstick cooking spray and set aside.
Add 3 large eggs, 1 cup granulated sugar, ⅔ cup pumpkin puree, 1 teaspoon vanilla extract, 1 teaspoon ground cinnamon, ¼ teaspoon ground nutmeg, and ¼ teaspoon ground cloves to a large bowl and beat with a handmixer until fully combined.
In a separate bowl, whisk together ¾ cup all-purpose flour, 1 teaspoon baking soda, and ½ teaspoon salt. Add the flour mixture to the egg mixture until just barely combined, and no streaks of flour remain.
Spread the batter evenly in the prepared jelly roll pan. Bake in the oven for 13-16 minutes, until the center of the cake springs back when very gently pressed on.
Remove the pan from the oven and allow it to cool for just a couple of minutes, until it’s cool enough to touch. Use the parchment to lift the cake out of the pan before gently rolling up the cake from a short end, allowing the parchment to roll up inside it. Keeping the cake in a roll, let it cool completely on a wire rack
Cream Cheese Filling
While the cake cools, add 1 (8-ounce) package softened cream cheese, 3 tablespoons softened salted butter, 1 cup powdered sugar, and ½ teaspoon vanilla extract to a large bowl and beat with a hand mixer until smooth.
Once the cake has cooled completely, carefully unroll it. Spread the cream cheese filling over the cake, leaving a ¼-inch border around the edges. Tightly roll the cake back up from the short side, removing the parchment paper as you go.
Chill the cake for at least an hour before dusting with powdered sugar and serving.
Make Ahead and Storage Instructions
Make Ahead: Keep the rolled cake (unfilled) in the fridge for up to 2 days, then bring it to room temperature before filling. Or fully assemble with filling and refrigerate up to 4 days. Always wrap well in plastic.
Storing: Wrap the cake in plastic wrap and refrigerate for up to 5 days.
Freezing: Best frozen fully assembled. Wrap the chilled cake in several layers of plastic wrap plus foil, then place it in a freezer bag. Freeze up to 3 months. Thaw overnight in the fridge before slicing. You can also slice, wrap, and freeze individual pieces for up to 3 months.
Alyssa Rivers is the author of ‘The Tried and True Cookbook’, a professional food photographer and experienced recipe-developer. Having a passion for cooking, her tried and true recipes have been featured on Good Morning America, Today Food, Buzzfeed and more.
This website may contain affiliate links and advertising so that we can provide recipes to you. Read my disclosure policy.
These Caramel Apple Cinnamon Rolls are soft, gooey, and baked with cozy fall flavor in every bite. The homemade dough bakes up perfectly fluffy, and the rich caramel topping makes them feel extra special.
A Reader’s Review
I made these last night for the boys in my family going out hunting. I had to try one and WOW they are amazing. I was scared of making them, but once I started, just so easy. Thanks so much for sharing.
Jayme
Rollin’ Into Your New Favorite Treat
Beginner-friendly dough: The dough is really easy to make and turns out soft and tender every time.
A caramel apple twist: Fresh apples baked inside with a luscious caramel glaze on top.
Cozy, fall flavor: These are the ultimate fall sweet rolls! They will fill your kitchen with the most delicious smell of apples and cinnamon.
Caramel Apple Cinnamon Roll Recipe
Making these Caramel Apple Cinnamon Rolls is my favorite way to kick off fall! Other recipes I like to make in the fall are my pumpkin cheesecake snickerdoodles and pumpkin roll.
Dough
Melt Butter: In a small saucepan over medium-low heat, add milk and softened unsalted butter. Stir until the butter has melted and remove from the heat. Let it stand until lukewarm temperature.
Dry Ingredients: In a large mixing bowl, whisk together 2 ¼ cups of the 3 ¼ cups all-purpose flour, instant yeast, granulated sugar, and salt.
Combine: Add the flour mixture to the bowl of a stand mixer with the dough hook attachment. Add the egg and water and start mixing on medium-low speed. Slowly add the milk mixture and remaining flour until the dough starts to form and becomes smooth. Let the dough rest for 10 minutes.
Roll Dough: On a lightly floured surface, roll the dough into a large 9×15-inch rectangle. About ¼-½ inch thick.
Alyssa’s Pro Tip
Why aren’t my rolls fluffy? Dense rolls usually come from adding too much flour when the dough feels sticky. Try kneading longer instead. Over-proofing or under-kneading can also keep them from getting light and fluffy.
Filling
Make Cinnamon Sugar Filling: In a small bowl, combine the cinnamon, nutmeg, and brown sugar for the filling. Spread the softened unsalted butter onto the dough, keeping it about a ½ inch away from the edge.
Add Diced Apples: Sprinkle the cinnamon and brown sugar evenly over the softened butter. Sprinkle with chopped Granny Smith apples.
Roll Up Dough: Roll up the dough from the long side into a log and pinch the seams. Cut into 9-12 slices, depending on how thick you want your cinnamon rolls.
Rise & Bake: Place in a greased 9×13-inch pan or 9-inch pie pan, cover with a damp cloth, and let rise for 30 minutes. While the cinnamon rolls are rising, preheat the oven to 375°F. Bake for 25 minutes, or until the tops are just golden brown.
Alyssa’s Pro Tip
Rising Tip: Let rolls rise in a warm spot. For quicker results, warm the oven to 200°F, turn it off, then place covered rolls inside until doubled in size.
Caramel Glaze
Melt Butter & Sugar: In a medium saucepan, melt the unsalted butter, brown sugar, and sweetened condensed milk until the sugar dissolves.
Glaze Baked Rolls: Bring to a boil over medium-high heat for about 2-3 minutes. Drizzle over the warm cinnamon rolls.
In a small saucepan over medium-low heat, add ¾ cup milk and ⅓ cup softened unsalted butter. Stir until the butter has melted and remove from the heat. Let stand until lukewarm temperature.
In a large mixing bowl, whisk together 2 ¼ cups of the 3 ¼ cups all-purpose flour, 2 teaspoons instant yeast, ¼ cup granulated sugar, and ½ teaspoon salt.
Add the flour mixture to a stand mixer with the dough hook attached. Add 1 egg and ¼ cup water and start mixing on medium-low speed. Slowly add the milk mixture and remaining flour until the dough starts to form and becomes smooth. Let the dough rest for 10 minutes.
On a lightly floured surface, roll the dough into a large 9×15-inch square. About ¼-½ inch thick.
Filling
In a small bowl, combine 1 tablespoon cinnamon, ¼ teaspoon nutmeg, and ¾ cup packed brown sugar for the filling. Spread 5 tablespoons softened unsalted butter onto the dough, keeping it about a ½ inch away from the edge.
Sprinkle the cinnamon and brown sugar evenly over the top of the softened butter. Sprinkle with 1 chopped Granny Smith apple.
Roll up the dough from the long side into a log and pinch the seams. Cut into 9-12 slices, depending on how thick you want your cinnamon rolls.
Place in a greased 9×13-inch pan or 9-inch pie pan, cover with a damp cloth, and let rise for 30 minutes.
While the cinnamon rolls are rising, preheat the oven to 375 degrees Fahrenheit. Bake for 25 minutes or until the tops are golden brown.
Caramel Glaze
In a medium saucepan, melt ¼ cup unsalted butter, ½ cup brown sugar and ¼ cup sweetened condensed milk until the sugar dissolves.
Bring to a boil over medium-high heat for about 2-3 minutes. Pour over the warm cinnamon rolls.
Storing: Place in an airtight container or zip-top bag and store in the refrigerator for 2 to 3 days.
Freezing: Wrap each cinnamon roll individually in foil, then place in a freezer bag. Store in freezer for 1 to 2 months.
Reheating: Reheat in the oven at 350°F until warm for best results or microwave for 1 to 2 minutes.
Alyssa Rivers is the author of ‘The Tried and True Cookbook’, a professional food photographer and experienced recipe-developer. Having a passion for cooking, her tried and true recipes have been featured on Good Morning America, Today Food, Buzzfeed and more.
This website may contain affiliate links and advertising so that we can provide recipes to you. Read my disclosure policy.
Tuscan garlic skillet chicken is one of those dinners I make and then wonder why I don’t make it more often. Juicy chicken and sun-dried tomatoes all cook together in one skillet. No heavy cream needed. Just fresh, bold flavor in 30 minutes!
A Reader’s Review
I’ve made this dish twice already in a month, and with some family coming over this weekend.. I’m making it again! It’s so flavorful and easy, I’m in love with it! Thanks for sharing!
– Natalie
Dinner Goals: Quick, Easy, and Delicious!
Big flavor in 30 minutes: Juicy chicken, garlic, and sun-dried tomatoes come together for a dinner that feels restaurant-worthy without the wait.
One-skillet simplicity: Easy cleanup means more time to relax after dinner. Pair it with garlic bread and a nice salad.
Family favorite comfort: This dish has hearty flavors everyone will enjoy. It’s perfect for busy weeknights or even a special weekend dinner.
Tuscan Garlic Skillet Chicken Ingredients
Make it spicy: Add some chili flakes to the dish for some heat!
Spinach: Add fresh spinach for added nutrition.
Use Sun-Dried Tomato Oil: Save the oil from your can of sun-dried tomatoes and use it to cook with. It adds tons of flavor!
This skillet chicken with sundried tomatoes and mushrooms is one of those meals I can throw together last minute. It’s quick, delicious, and always a hit with everyone! Plus, the leftovers make the best hearty, protein-packed lunch the next day.
Cook Chicken: Heat olive oil in a large skillet over medium-high heat. Season the chicken with salt and pepper and cook in the skillet for about 3 minutes on each side until the chicken is seared and fully cooked. Remove the chicken and set it aside.
Cook Mushrooms: Add the sun-dried tomato oil to the skillet with the onion, garlic, and mushrooms, and cook until tender.
Add Tomatoes & Seasonings: Stir in the sun-dried tomatoes, fire-roasted tomatoes, parmesan cheese, salt, pepper, oregano, and thyme.
Simmer and Serve: Place the chicken back into the skillet and cook until the sauce is bubbling. Remove from heat, then add salt and pepper as needed. Garnish with chopped basil.
Alyssa’s Pro Tip
How to know when the chicken is done: Look for the juices to run clear, or use a meat thermometer to be sure you have perfectly cooked chicken. The internal temperature should be 165 degrees.
Heat 1 tablespoon olive oil in a large skillet over medium-high heat.
Season 1 pound thinly sliced chicken breastswith salt and pepperand cook the chicken in the skillet for about 3 minutes on each side until the chicken is seared and fully cooked. Remove the chicken and set aside.
Add 1 tablespoon sun-dried tomato oil to the skillet with ¼ cup chopped onion, 3 garlic cloves minced, and 12 ounces sliced mushroomscook until tender.
Stir in ½ cup chopped sun-dried tomatoes, 2 (15-ounce) cans fire-roasted tomatoes, ¼ cup grated parmesan cheese, 1 teaspoon salt, 1 teaspoon pepper, 1 teaspoon oregano, and ¼ teaspoon thyme.
Place chicken back into the skillet and cook until the sauce is bubbling. Remove from heat, add salt and pepper as needed. Garnish with fresh chopped basil.
Storing and Reheating Instructions
Refrigerator: Let the chicken cool completely, then store it in an airtight container for 3–4 days.
Freezer: Freeze in an airtight container for up to 6 months.
Reheat: If frozen, thaw overnight in the fridge. Warm over medium heat on the stove until heated through.
Nutrition information is automatically calculated, so should only be used as an approximation.
More Tuscan-Inspired Recipes
About Alyssa Rivers
Alyssa Rivers is the author of ‘The Tried and True Cookbook’, a professional food photographer and experienced recipe-developer. Having a passion for cooking, her tried and true recipes have been featured on Good Morning America, Today Food, Buzzfeed and more.
This website may contain affiliate links and advertising so that we can provide recipes to you. Read my disclosure policy.
Spice meets creamy! This Jalapeño Ranch Dressing is cool, tangy, and just the right amount of zesty heat. Perfect for drizzling, dipping, or smothering on everything from salads to tacos.
Your Ranch Glow-Up
Cool with a Kick: Creamy ranch gets a bold upgrade with fresh jalapeños for just the right balance of heat and tang.
Versatile: Use it as a salad dressing, dip for veggies, drizzled over tacos and chimichangas, or even a sauce for burgers and wraps.
Fresh & Flavorful: Made with real herbs, lime, and jalapeños, this dressing tastes way brighter than anything store-bought.
Quick to Whip Up: Toss everything in a blender and you’ve got a delicious dressing in minutes!
Jalapeño Ranch Dressing Ingredients
Swap the Base: For a lighter, tangy twist, you can replace some or all of the mayo and sour cream with plain Greek yogurt instead.
Turn Up the Heat: Want an extra kick? Then stir in a pinch of red pepper flakes or chili powder to spice things up.
Get Creative: This jalapeño dressing isn’t just for salads! Use it as a dip for avocado egg rolls, a spread on sandwiches, or a drizzle over tacos.
How to Make Jalapeño Ranch Dressing
This easy recipe comes together in just minutes. It’s so simple and has fresh ingredients and the best flavor, you’ll never go back to store-bought!
BlendIngredients: Blend the ingredients until smooth and creamy. Enjoy this dressing on salads, use it as a dip for vegetables, or a sauce for anything you desire!
Alyssa’s Pro Tip
Jalapeño: If you LOVE the spicy jalapeño flavor, then add 2 jalapeños to the blender! You can also throw in a few seeds because that’s where the heat is.
In a blender, add 1 cup mayonnaise, ½ cup sour cream, ¼ cup buttermilk, 1 (1-ounce) packet ranch seasoning powder, 1 whole jalapeño, 2 teaspoons lime juice, ½ cup chopped fresh cilantro, and ¼ teaspoon salt
Blend until smooth and combined. Store in an airtight container in the refrigerator for up to 1 week.
Storage: Keep jalapeño ranch in an airtight jar or container in the fridge for up to 1 week. Stir or shake before using if ingredients settle.
Alyssa Rivers is the author of ‘The Tried and True Cookbook’, a professional food photographer and experienced recipe-developer. Having a passion for cooking, her tried and true recipes have been featured on Good Morning America, Today Food, Buzzfeed and more.